Master Bedroom Ideas

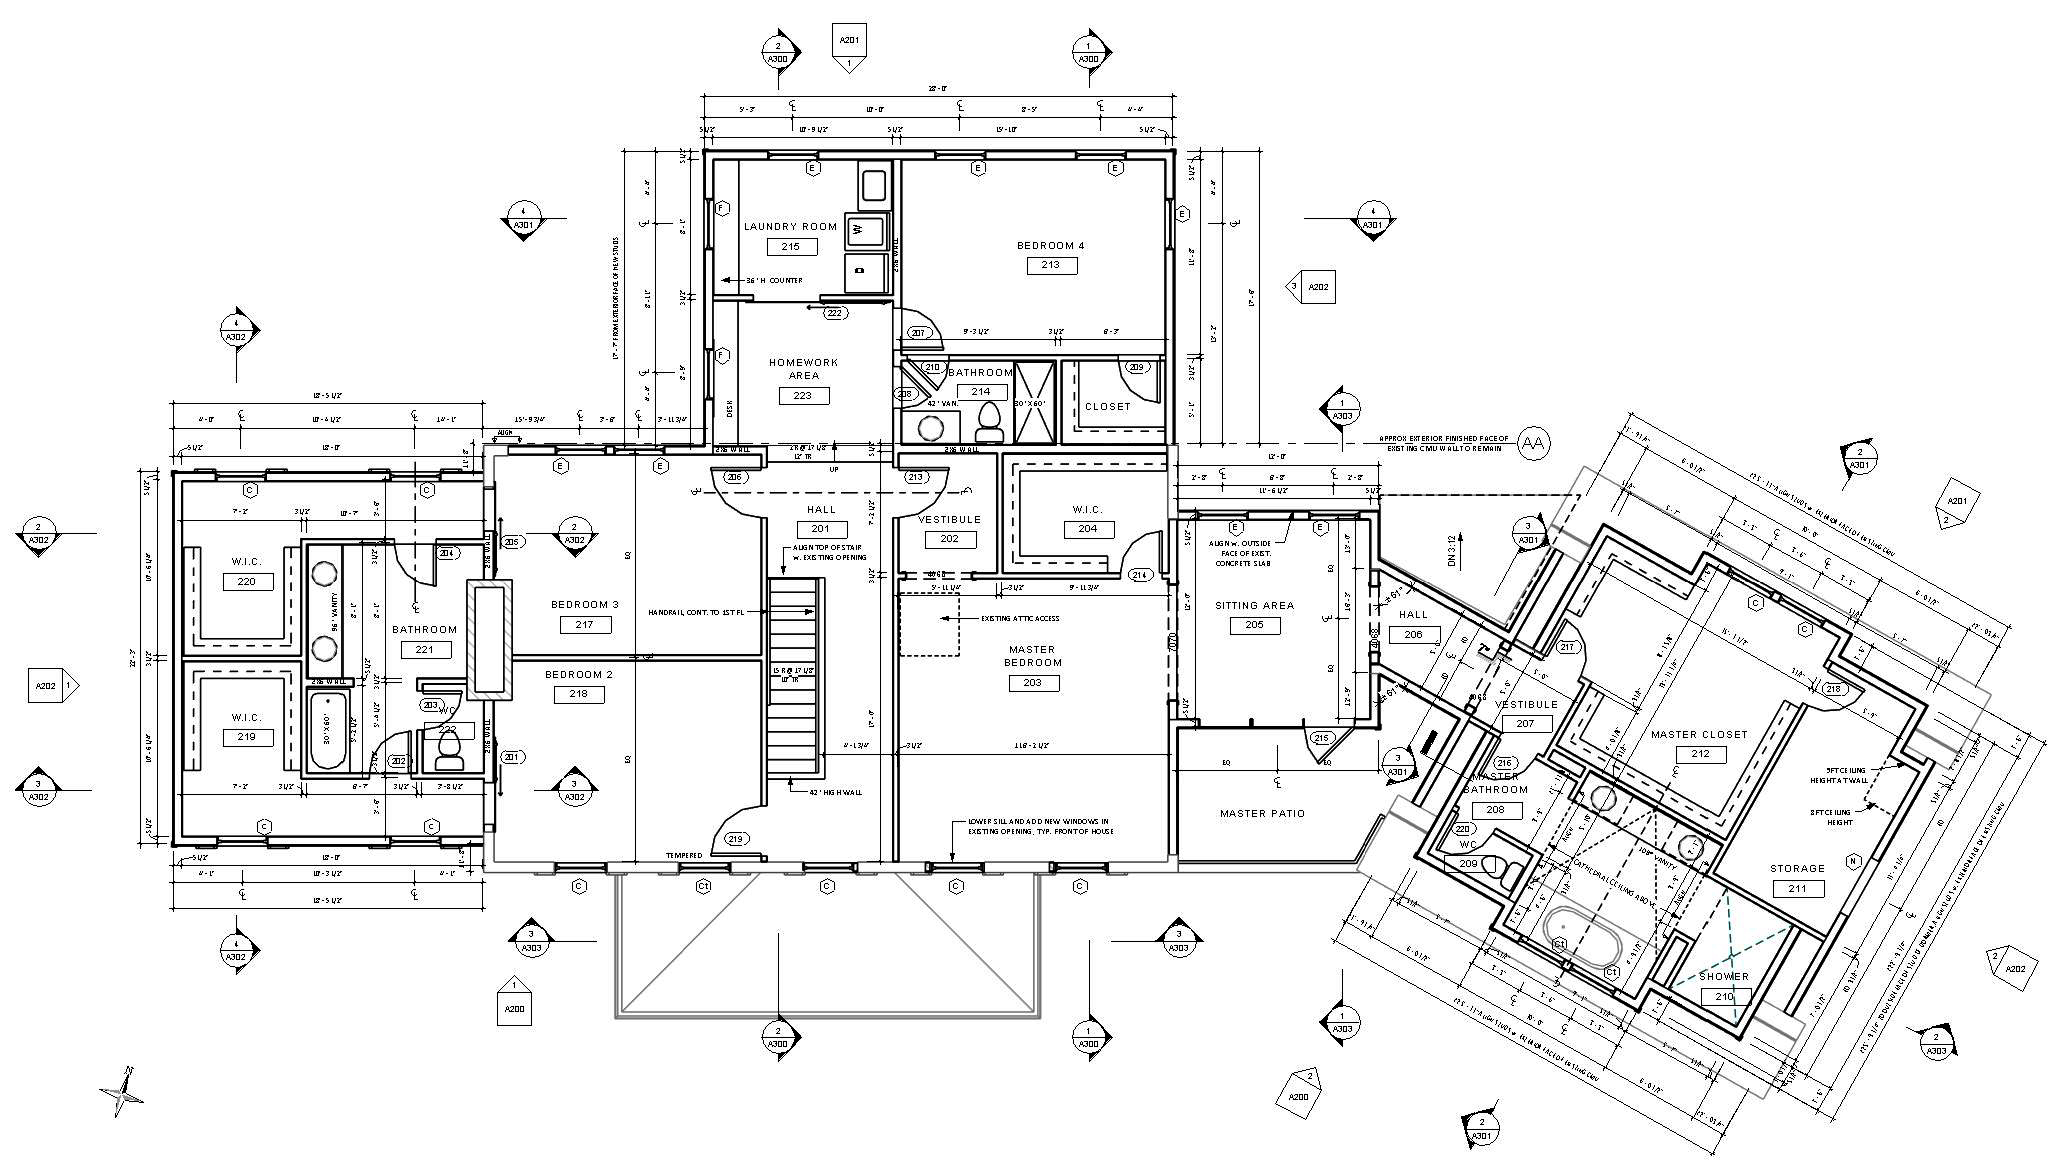
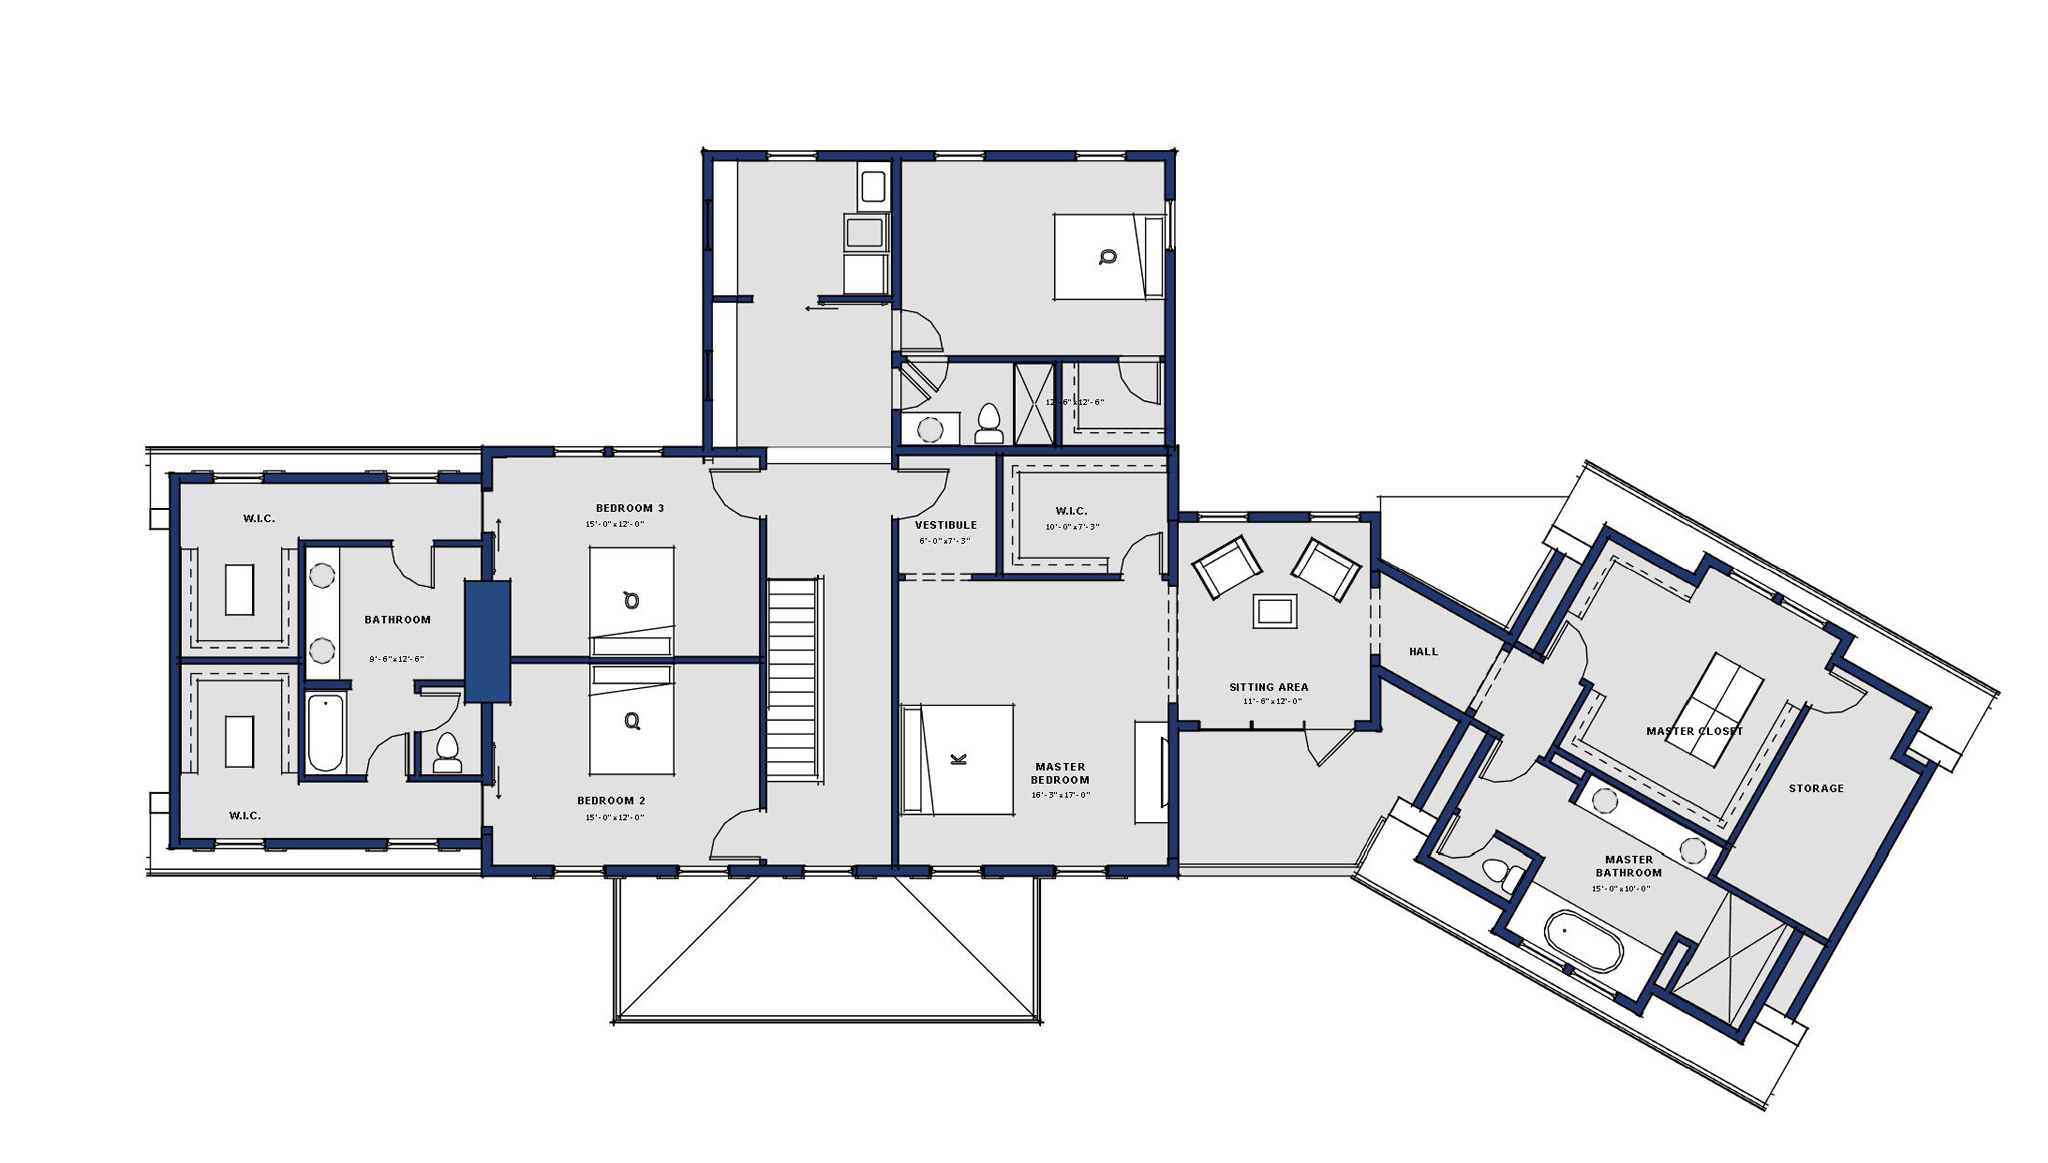
How much space do I need for my new master bedroom?

This is a common question for homeowners building a new addition. Like everything else, it depends and there are lots of options. You can begin to identify the correct size for your space by considering how you will be using it. Do you have a king bed? Do you want a sitting area in the bedroom? Do you want a walk-in closet?

Large master bedroom with walk-in closet behind the bed wall and space for a sitting area in the lower left corner

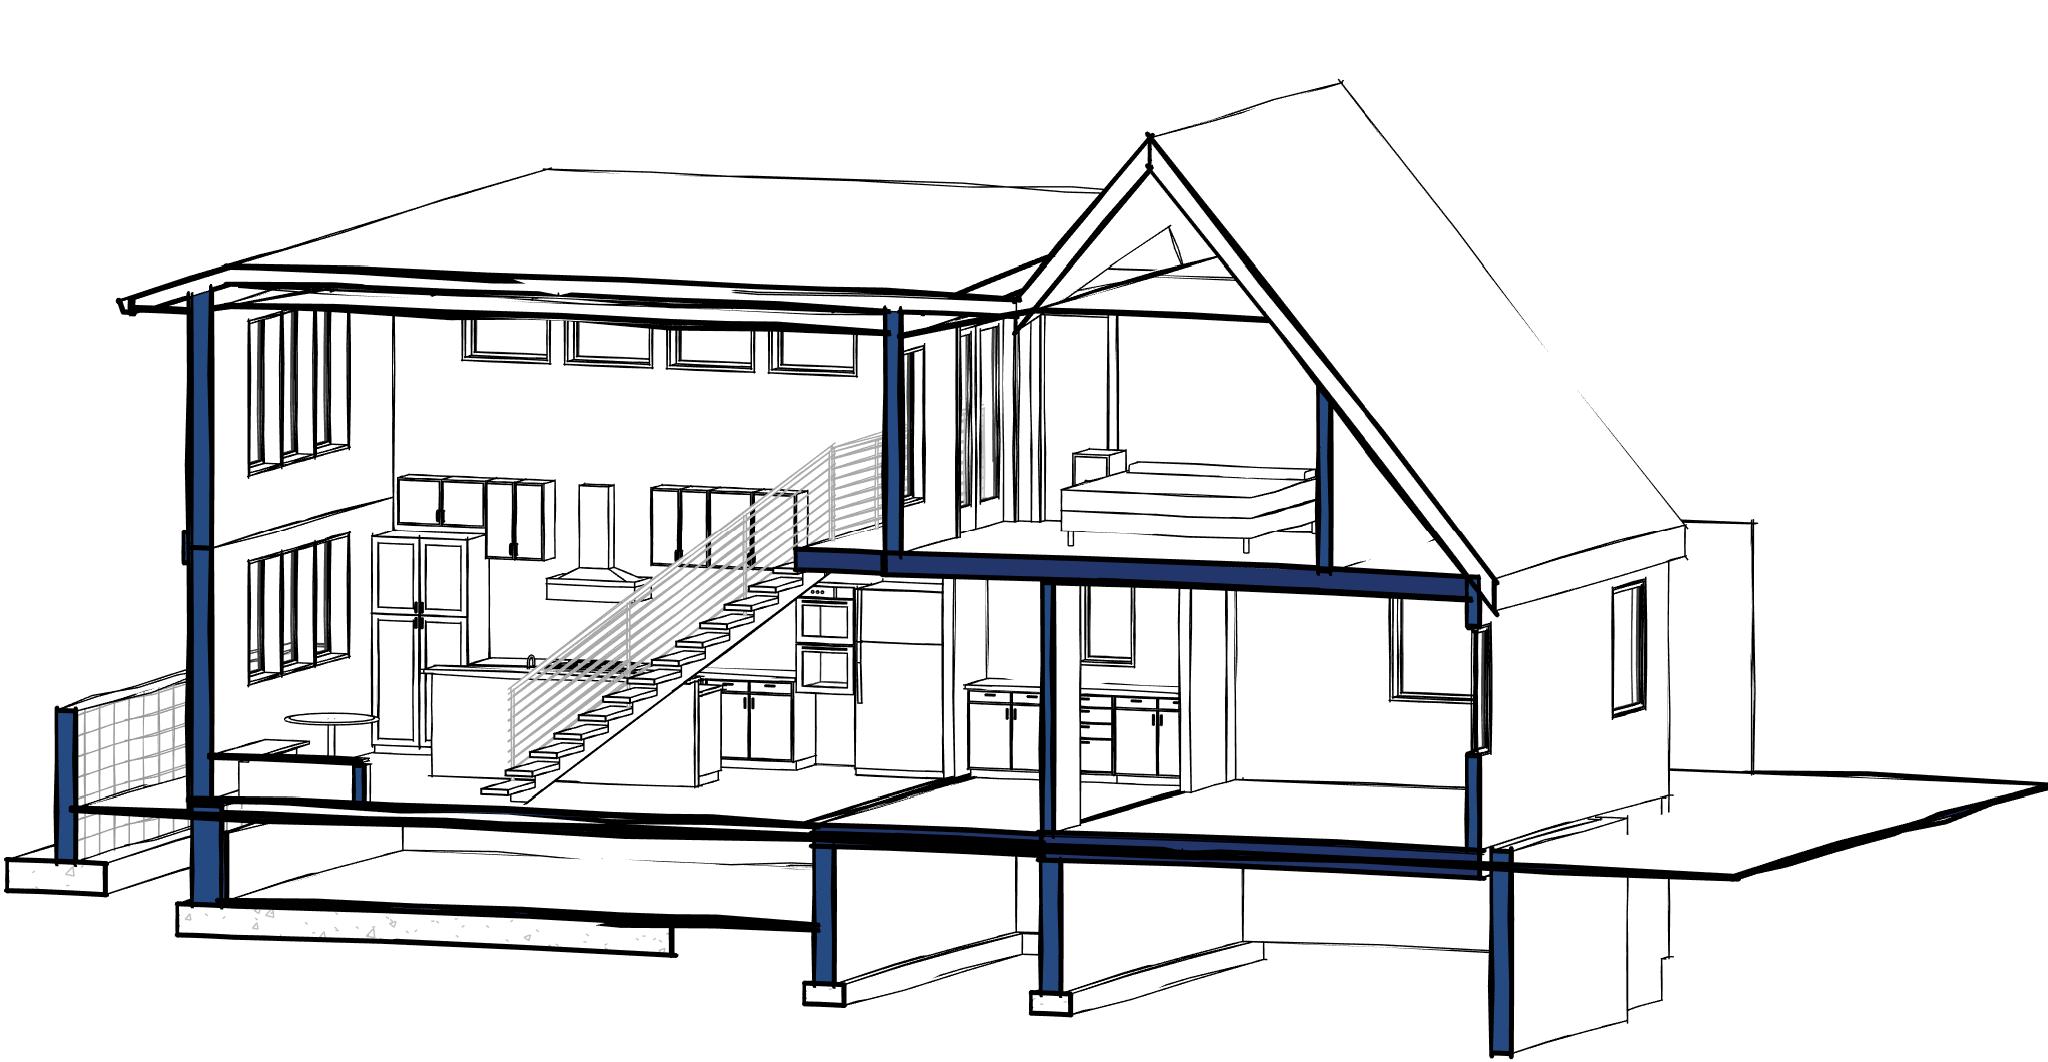
The images in this post show a few different master bedroom designs we have recently presented to some of our clients. Some of these have already been built, some will be constructed soon. They range from a modest 192 sq. ft to a luxurious 384 sq. ft. You can go smaller or larger, but this represents a good range.

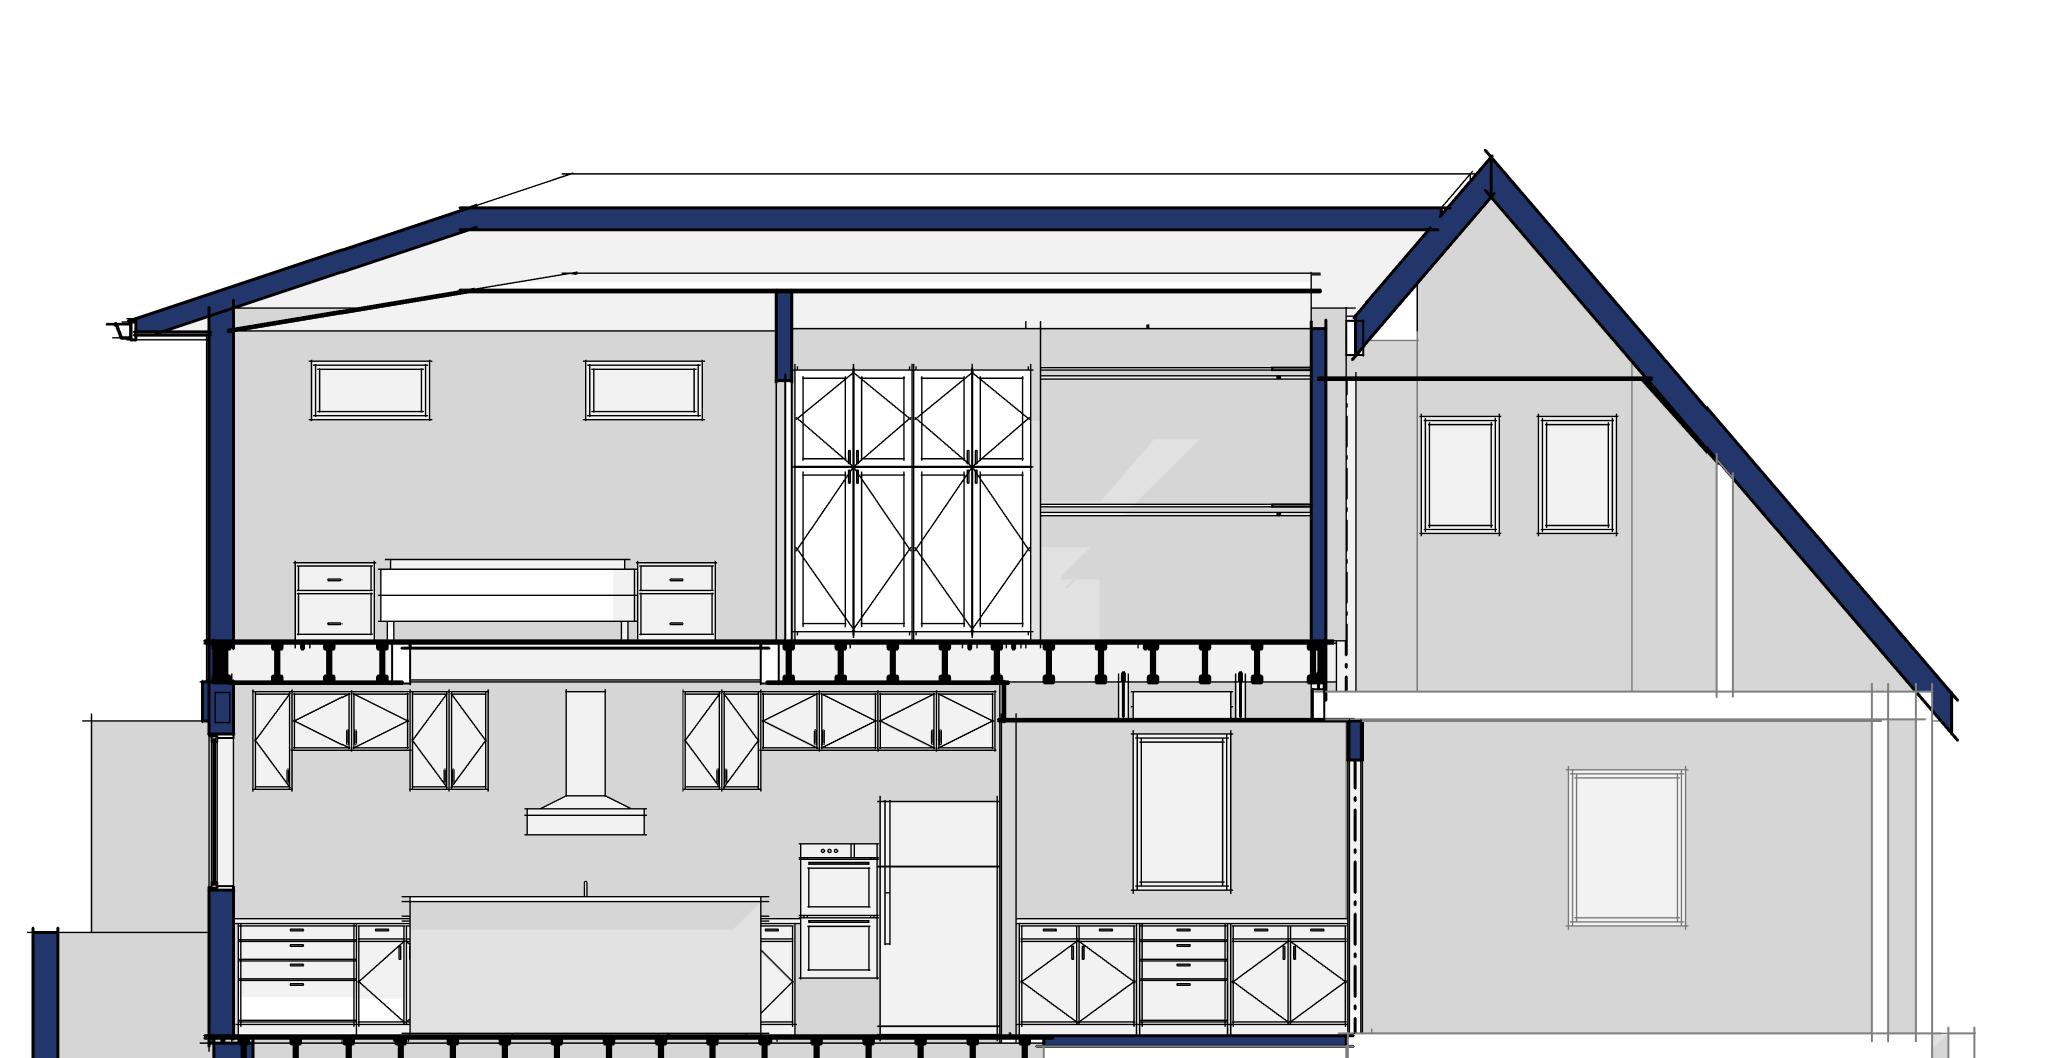
Moderate sized bedroom with windows above the bed and a credenza opposite the bed. In this particular design the door into the bedroom will use concealed hinges so the door will "disappear" into the accent wall on the left.

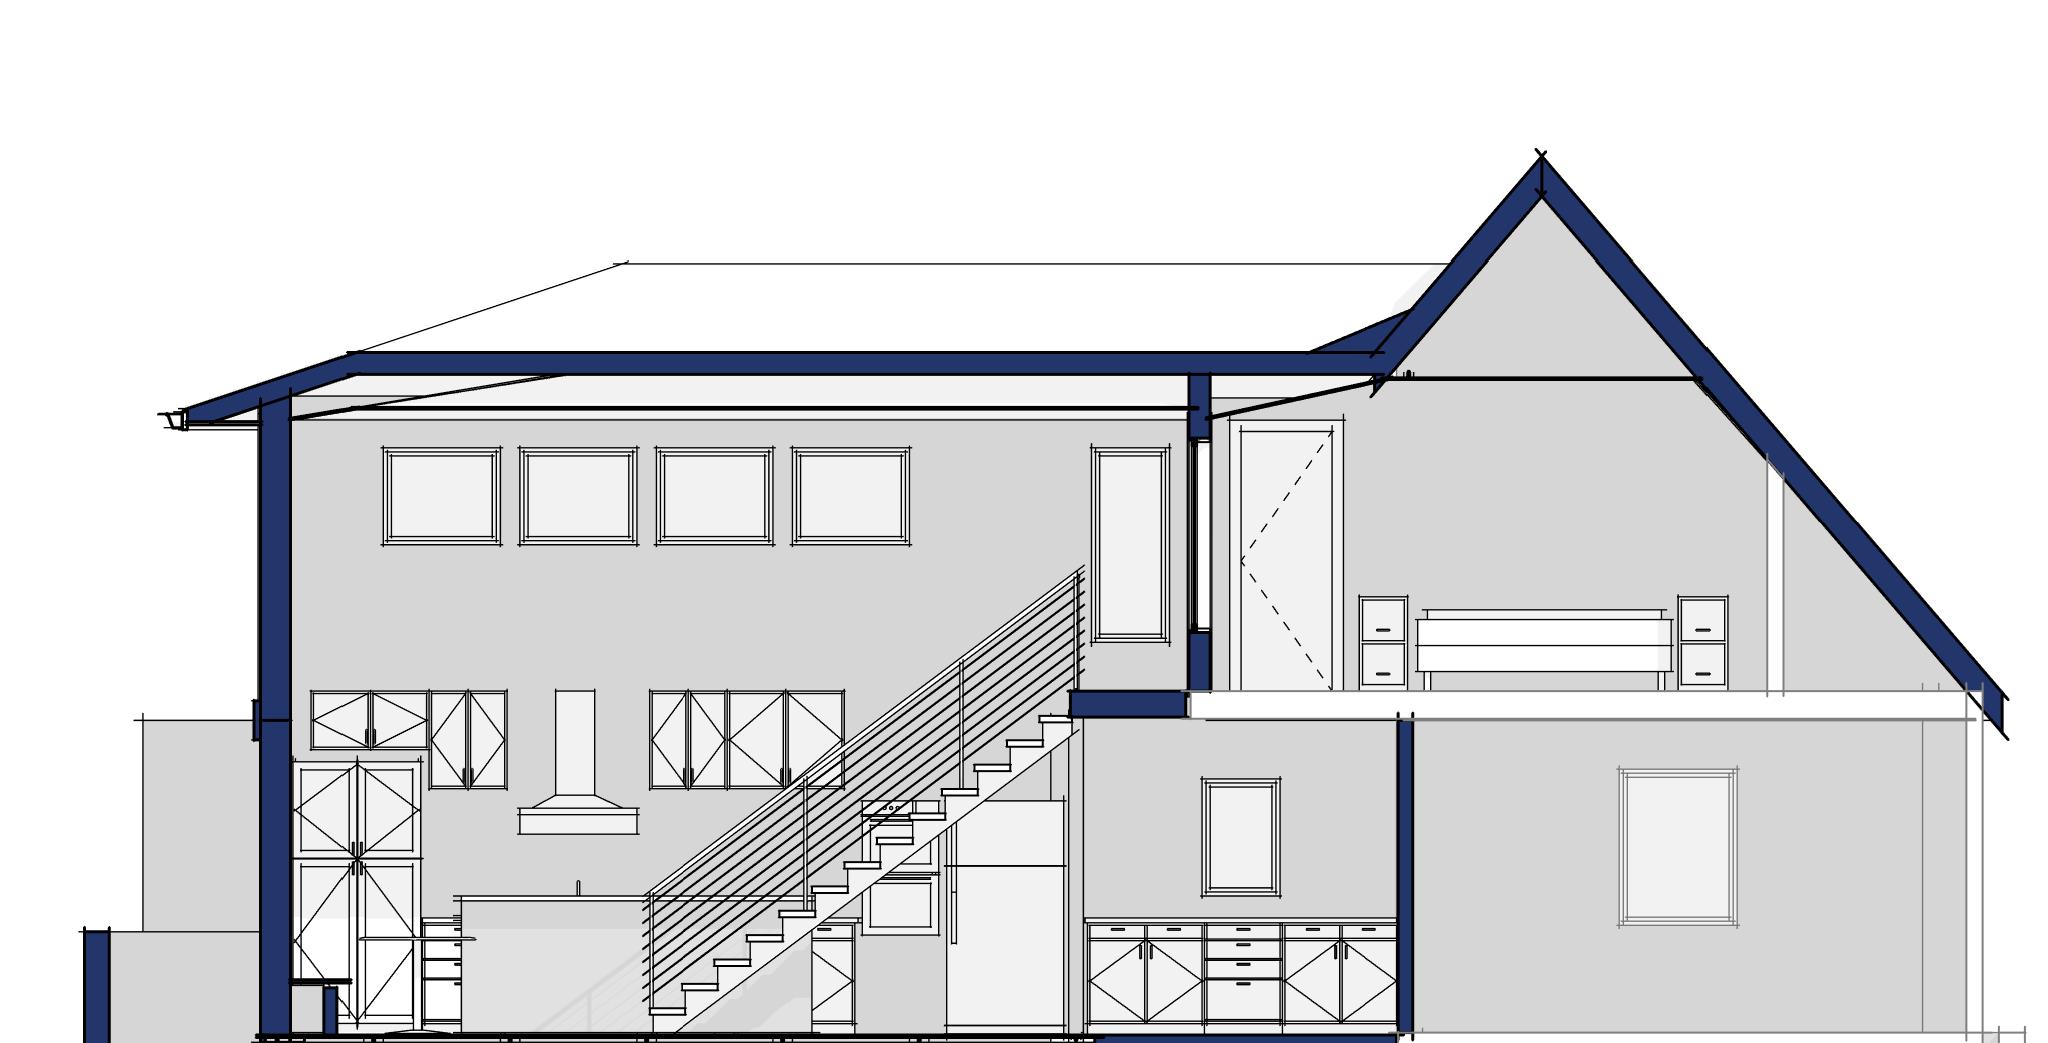
The bed will always find itself against a solid wall with at least three feet on either side for a side table and good access. Depending on the orientation of the room you could also have clerestory windows above the bed. Do you want to watch TV from bed? Then you’ll need solid wall space in front, or a window with a credenza below.

An average sized master bedroom with dual sliding doors into a large closet.

Will you have a sitting area? Account for around 36” plus a chair or two. This will usually find itself in a corner or centered on a window.

A smaller version of the first bedroom on this page. Single opening access to a smaller closet.

Location and size of the master closet is always a key consideration. You will need at least five feet of width for the closet, which will allow shelves and hanging rods on each side and a path down the middle. At around nine feet of width you can begin to place furniture in the middle of the space, with shelves along the wall and still have circular access around the closet. Entry into the closet is often overlooked, but can be a good place for a personal design element. We like to either partition the closet off with a sliding door or have the closet open on either side of a wall behind the bed wall. See images below.

Home Addition - One Project Start to Finish - Design Development

This is part five of a series of posts that will attempt to tell the story of one project from beginning to end, from concept to completion. It is based on a typical home renovation project in Montgomery County Maryland, but many of the issues convey to most jurisdictions throughout the United States.

Part 1: Inception
Part 2: An Actionable Plan
Part 3: Site Assessment
Part 4: Schematic Design
Part 4B: Design Changes

Design Development

Design Development is a refining phase which takes us from Schematic Design to the beginning of Construction Documents. During this process the design becomes more detailed and major decisions points begin to occur.

The structural system is one of the major decision that should be resolved by the end of Design Development. Will the first floor be built over a crawl space or will it be a slab on grade? Will the new foundation be Concrete Masonry Units or Cast-in-Place Concrete? Will the floor framing be dimensional lumber such as 2x12s or will it be an engineered product like Plywood Web Joists? There are pros and cons to each of these decisions and there typically isn’t a right or wrong answer. While these items might not necessarily affect how your finished space looks, they definitely impact how the project is actually constructed.

Material finishes is another major decision that should be discussed, if not mostly resolved by the end of Design Development. You might not know which actual floor finish you want, but choosing tile, wood or carpet at this point will drive some of the structural and architectural decisions we have to make. You don’t have to choose your kitchen cabinets at this time, but if you know you want a 72” double vanity in your master bathroom, Design Development is the time to confirm that decision so we can be sure everything fits and that plumbing and structure can be coordinated.

As the design becomes more solidified, the drawings you will be presented with will become more detailed and less sketchy. This doesn’t mean that you can’t still make changes if what you’re given isn’t exactly what you want. Sometimes as the drawings and structural systems become clearer new challenges and opportunities present themselves.

Home Renovation Ideas: Exposed Joist Ceiling

Exposed Joist Ceiling

A stylish home renovation idea for your new project could be an exposed joist ceiling. We covered this briefly in a previous blog about design changes, but it’s a great topic to discuss further.

Leaving the structure exposed is a bold architectural move,  that in many cases can be the defining design element of a space or building. Some famous examples are the Pompidou Center in Paris (Renzo Piano + Richard Rogers), Hearst Tower in New York (Sir Norman Foster) the Beijing National Stadium, aka Bird’s Nest (ai WeiWei and Herzog + de Meuron) or the Capital Aikikai dojo in Silver Spring, MD (Mangan Group Architects).

Architects discuss exposed structure as a design element philosophically, by referring to the honesty of the design. The skeleton wants to be revealed so to speak, so that the building is not hiding anything. To be honest, the structure and other materials of a building should be represented in their truest nature. This idea was formally presented by the British architecture critic John Ruskin in his 1849 book, The Seven Lamps of Architecture.

For your project, leaving the ceiling joists exposed is a great way to define a special space or increase your ceiling height. Plus, it looks really cool.

As with most cool design elements we tend to work in, actually achieving an exposed joist ceiling is not as simple as browsing Pinterest and sending the pictures to your contractor. The three main concerns we have with this design are Code, Aesthetics and MEP.

Code:

In many jurisdictions the International Residential Code is the document with which your project will have to comply. On the topic of exposed structure, or more specifically, Fire Protection of Floors (Section R302.13) the code allows exposing the structure of the floor above if you keep it to a small area (less than 80 sq. ft), have sprinklers, or use 2X10 lumber or bigger. This basically means you can’t use a plywood web joist as your design element. You must use dimensional lumber or engineered wood beams.

Aesthetics:

Given the above, the first decision should be what structural material to actually use for your structure. We particularly like the look of lumber, but you will need to choose high-quality boards, likely graded #1 or higher. Do you want to paint them? Stain them? Trim them with a nicer veneer?

You also have to consider the rest of the building materials you will see. The plywood that is probably going to be used for the subfloor above isn’t meant to be seen, and won’t look great. It will probably have painted on brand names or other identifying marks. This exposed area, between the joists, could be finished with drywall, beadboard, reclaimed wood, sanded plywood, the list goes on and on.

There is also the issue of how the structure itself is supported. Normally the 2nd floor joists will sit on the 1st floor walls, but you can’t leave this area exposed for a few reasons, insulation being a primary concern. You could use joist hangers to hang the floor joists on an architectural grade beam but you will need to pick an architectural grade hanger…these are also not items that are generally built with the intent of being displayed prominently.

MEP (Mechanical, Electrical, Plumbing):

Do you need to get any pipes, wires or ducts across your ceiling where you intend to leave it exposed? That could complicate things. The easiest solution would be to route any plumbing or ductwork  to avoid your exposed ceiling area. Ductless mini-split HVAC systems are becoming very popular, and can help resolve this issue. You could also choose to run any ducts parallel with the structure. Check out how we did that at our Mangan Group Architects Studio.

Plumbing pipes need to be insulated, and there is not a great way to make this look good.

Electrical wiring should not be exposed either, but can potentially be hidden above your ceiling finish material. As mentioned above, you can finish the space between the joist with a number of different materials. If you add some 1x3 furring strips before attaching the ceiling finish you will provide yourself a channel for routing the needed electrical wiring.

Review

As you can see, lots of thought has to go into actually creating that exposed ceiling look. With proper planning and an understanding of some of your limitations there's no reason you can't create this in your project too. Comments? We'd love to hear your thoughts!

Home Addition - One Project Start to Finish - Part 4b

This is a detour from part four of a series of posts that will attempt to tell the story of one project from beginning to end, from concept to completion. It is based on a typical home renovation project in Montgomery County Maryland, but many of the issues convey to most jurisdictions throughout the United States.

Part 1: Home Addition - Where to Start

Part 2: Home Addition - Set a Budget

Part 3: Home Addition - Zoning

Part 4: Home Addition - Designs

Part 4b – Design Changes

This isn’t a planned part of the process, but homeowners asking for major design changes is not uncommon. Your new addition is a huge investment and you want it to be perfect! It’s ok to change your mind about the design of your project, but the earlier you can make up your mind on major decisions, the better. It’s relatively easy to change the scope of the project when it’s still in the Preliminary Phase. The later you get in the process, the more difficult and costly a change could be.

In our example project, we all loved the spacious, double height kitchen. The large windows and balcony allowed views of the back yard and provided light into the master bedroom. As we started to move this design into the next phase, Design Development, the clients began discussing an alternate approach. As great as this kitchen is, the renovation would add more value to the home with a complete second floor.

Though we were sad to see the open-riser stair removed, the new concept allowed for some new design opportunities. The clients still desired high ceilings in the kitchen, and we were able to leave a portion of the ceiling joists visible. Exposed structure is often an attractive detail that can be modern or rustic, and added nearly a foot of ceiling height to the kitchen. A few windows and doors changed, but the kitchen design stayed mostly the same, so the clients were able to get their second floor without losing space in the kitchen.

The roof also stayed mostly the same, so the additional work for this seemingly major design change was limited to configuring a new second floor. The Preliminary level plans, sections and 3D views allowed the clients to get a good feel for the space and decided that their new second floor concept would work for them.

Which design do you think is best?